SapEM Dashboard Guide
A complete, start-to-finish walkthrough of setting up your dashboard — from powering on the hub to placing every sensor, repeater, and tubing line on your map.
On this page
Set Up the Receiving Hub
Install the antenna.
Plug in the HDMI cable to the board (either port) and desired display device.
Plug in powerblock and turn the switch on (if your version has one).
Plug in ethernet (recommended). If not using ethernet connect the hub to WiFi by clicking the WiFi symbol in the top right corner (mouse not included, can be installed in any USB port).
Create Your SapEM Account
On any device (besides the hub) go to www.concept-solid.com/sapem and click Login in the top right corner.
Click Create Account.
Follow directions on screen. Once completed, login to your dashboard.
Connect the Hub to Your Account
Make sure the hub is powered on and wait about 5 minutes to let it finish booting and connecting to the network.
On your dashboard, press the green "+ Add Hub" button in the top row.
In the "Add Receiving Hub" window, enter the Hub Hardware ID printed on the inside of the hub enclosure, and optionally give it a Hub Name (e.g. "North Sugarbush"). The name can be changed anytime.
Press "Add Hub." The dashboard will refresh and a new section for that hub will appear with its gauge, stats, and sensor table.
Add and Assign Sensors
Install the antenna on the sensor.
Power on the sensor by pressing the metal button on the side of the enclosure. Do the first binding close to the hub.
Wait about 30 seconds, then on the dashboard press the green "+ Add Sensor" button.
In the "Add Sensor Node" window, enter the 4-digit Sensor Serial Number printed inside the sensor enclosure, and optionally a Sensor Name. Press "Add Sensor." A brand-new sensor won't show readings immediately — data appears once it reports in, which can take a few minutes.
Press the "Assign Sensor" button at the top of the dashboard. Choose the sensor under Select Sensor, the hub under Select Hub, and pick an Action:
Assign to this hub — adds the sensor to the chosen hub without removing it from any other hub it's already on. Use this for a sensor that reports to more than one hub.
Move to this hub — makes the chosen hub the sensor's only hub, removing it from every other hub first.
Remove from this hub — unassigns the sensor from the chosen hub only.
Press "Apply." A sensor with no hub at all sits under the "Unassigned Sensors" table near the top of the dashboard until it's assigned.
Wait 30 seconds before powering on the next sensor to let each one finish binding to the hub before you start the next.
Notes
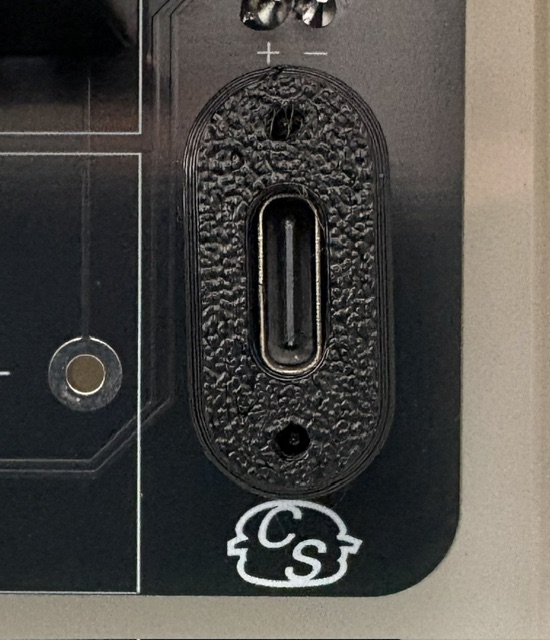
It is recommended to charge all sensors fully before deploying for a season. The charging port for sensors is found in the bottom right corner of the circuit board inside the box (USB‑C cable included with every hub). While charging, the small indicator light in the top right on the board glows red. Once the battery is fully charged, that same light switches to blue.
Reading Your Dashboard
Each hub gets its own card on the dashboard showing a live vacuum gauge, and Hub Stats: sensors on that hub, average temperature, average pressure, and when data was last received.
Under Hub Stats you can set an alert threshold — enter a percentage and any sensor reading that far below the hub's average pressure is flagged in a "Low pressure sensors" list and highlighted amber in the table.
Below that, each hub's sensor table lists every assigned sensor with its live P1/P2 pressure, temperature, signal strength, and last-seen time.
Tap any sensor's row (not the drag handle) to open a "spotlight" popup with just that sensor's gauge and readings — handy for checking one line at a glance. Tap the X, or tap outside the popup, to close it.
Press "↻ Refresh" at the top anytime to pull the latest readings and reconcile the map without reloading the page.
Renaming Things and Removing a Hub
Press the small pencil icon next to a hub's name to open "Edit Names."
Change the Hub Name at the top, and rename any of that hub's sensors in the list below it (each shows its serial number for reference). Press "Save" to apply all the changes at once.
To remove a hub entirely, press "Remove Hub" in that same window, then confirm. Any sensors assigned to it move to the "Unassigned Sensors" table rather than being deleted — reassign them to another hub whenever you like.
Removing a hub takes it off the dashboard completely. To bring it back later, use "+ Add Hub" again with the same Hub Hardware ID.
Reordering Sensors in a Hub
Each sensor row has a small grab handle (three pairs of dots) just to the left of its name.
Press and hold the handle, then drag the row up or down to the position you want — this works with a mouse or a finger on a phone.
Release to drop it in place. The new order is saved automatically for that hub and stays that way across refreshes.
Populating the Map
Scroll to the bottom of the dashboard to find the shared "Map" section — every hub and sensor you've added shows up here together on one satellite map of your sugarbush.
8a. Placing a Sensor
Any sensor without a map position yet shows up in a "Not yet placed on map" bar right above the map, with a "Place [sensor name]" button for each one.
Press that button (or, for a sensor already on the map, tap its dot and choose "Reposition marker" from the popup). A marker appears at the map's center and the map switches to placement mode: "Tap the map to reposition."
Tap the spot on the map where that sensor actually sits, or press "My Location" to jump the marker to your phone's current GPS position (then fine-tune with a tap if needed).
Press "Save" to lock in the position, or "Cancel" to back out. Saved sensors show as a colored dot on the map — the color reflects that sensor's current pressure reading.
8b. Adding Hubs, Repeaters, and Notes
Use freestanding markers for anything on the map that isn't a sensor — the hub itself, a signal repeater, or a plain note like "tree down."
In the top-left corner of the map, press the pink "Marker" button.
Tap the map to place it (or use "My Location"), then press "Next."
Choose what kind of marker it is — Repeater, Hub, or Flag / Note — each gets its own icon on the map.
Type a name (e.g. "Back Field Repeater") and press "Save."
Tap any freestanding marker later to Reposition, toggle its name label, or Delete it from its popup.
8c. Drawing Sap Tubing Lines
Press the "Lines" button (top-left of the map) to open the line panel.
If you have more than one hub, choose which hub the new line belongs to from the "Hub for new lines" dropdown.
Pick a line type: Mainline, Lateral, or Dropline.
Press "+ Draw Line," then tap the map once for each point along the tubing run. A running count shows how many points you've placed.
Press "Undo" to remove the last point, or "Finish" once you have at least two points to save the line (it's auto-named, e.g. "mainline 1"). "Cancel" discards the whole line.
8d. Editing, Labeling, and Deleting Lines
Tap anywhere on an existing line to select it. A small panel appears with Edit, Show/Hide Label, Delete, and Cancel.
Edit lets you drag any point to reshape the line, and drag or tap one of the small faded dots between points to add a new bend point there. You can also rename the line in the text field. Press "Save" or "Cancel."
Show/Hide Label keeps the line's name always visible on the map instead of only on tap.
Delete asks for confirmation, then removes the line permanently.
Sensor markers, freestanding markers, and lines each have their own "Show/Hide name (or label) on map" toggle — turn it on for anything you want visible at a glance without tapping it first.
Map Icon & Line Legend
Exact pressure-color thresholds may be tuned over time — the shapes (circle = sensor, square = hub, diamond = repeater, flag = note) are what stay consistent.